Grooming of cocker spaniel legs.


Next we will shave the hind leg area - you can use either the 1/4" or 1/2" comb, shave against the growth of hair, begin right above what would be his knee joint, and shave upward into the area you shaved the back coat off of. You only shave the outside flank of the rear legs, not the longer "feathers". See red area outlined on picture.

Now, the front legs - shave from the foot upward, onto the shoulders, and into the back coat area using the same comb or blade you used on the back legs. You can use the soft scrunchy or snood on his ears at this point to hold them up from the area being groomed. Keep the scrunchy nice and loose - don't hurt your dogs ears. Do not shave the back of the legs.

If your dog is getting antsy, take another break, let your clippers cool down, next we will start the head/ears.

Cocker spaniel bath


OK, after all your tools are in place the first thing you must do before any grooming happens is bathe your dog in a good dog shampoo. Put a cotton ball in each ear to avoid water getting in there. Rinse him well, towel off excess moisture, and blow dry. Most people use some type of leave-in coat conditioner to avoid mats and tangles. Use your metal comb & pin brush during drying to separate the hair and speed up the process. Try not to groom your dog if he has not been bathed first - it will make your clippers and scissors dull.
Keep it lighthearted & fun - I usually give my dog treats at intervals during the bath - one treat when I first put them in the tub, then another one after I wet them down, then another after getting soaped up, then another one when they're rinsed off. Keep praise low key & calm.

, , , , , ,

We start to groom a cocker!


So now your dog is clean, dry & all brushed out - where do you start? Anywhere, really! Let's begin with the back and work down. Place one of your combs on the end of your clipper - either the 1" or the 1/2", depending on how short you like your dogs coat on his back, or if you are using a 4-F blade instead, put it on now. With the comb, shave against the grain of the hair, starting at the tail and continuing to the neck & making sure the hair that is falling off does not tangle in with your dogs feathers (the long hair on his legs & sides).
If you are using the blade instead of the comb, you can shave with the direction of the hair to get a longer length if desired. I use the combs because the blade gets very hot during cutting, and with the comb on the hot blade never touches your dogs skin. Another plus to the combs is they are very lightweight, where the 4-F blade is heavier than the standard #10 blade. If you are having a problem controlling or gripping the clipper the extra weight of the 4-F blade can compound your difficulties.
Shave a small area, then put down your clippers & turn them off (let them cool). Brush out the area you have shaved, smooth it down with the horse hair brush, and see how you like it. If it is too short or too long then change your comb before proceeding. Clean the hair off your table as you go along to prevent it from tangling in with your dogs coat and causing a big mat. Give your dog a treat - good dog! Keep your voice calm and your tone down - nice calm praise.
Continue shaving the top coat. After you have finished this, let your dog run around a little - take a small potty break! Give him/her some treats - keep it fun.

, ,

Toe Care.

ToesCockers have hairy feet, which can make foot care more difficult. If hair is kept trimmed from between the toes and between the pads, the feet will stay drier, they will track less, and have better traction on slippery floors. This will reduce the number of foot infections and make nail care much simpler.

If your dog has sensitive (ticklish) feet, here's a tip for making grooming easier. Apply a bit of gum numbing jell (Oragel, Ambasol, etc.) between the toes and pads. His feet will soon be numb, and he won't squirm around as much. The effect takes 3 to 5 minutes to "set" but it wears off in half an hour.

I find the standard nail clipper is the best design. They are simple to use and maintain. The clipper should be kept clean and sharp. Most clippers come with a spare blade, but this is always lost before it's needed. Spare blades are sold separately.

Toe nails on your dog are a hardened protein, which grows around a "quick". The quick is very sensitive and bleeds freely if clipped. The idea is to cut the nail as short as possible, without cutting the quick. If you should cut into the quick, don't panic. The blood flow can be quickly stopped by applying alum or corn starch. Lucky has ticklish feet, so I clipped his nails too short twice. 2 years later, he's beginning to trust me again.

It is best to clip toenails frequently. If your dog's nails are long, remove 1/4" each week until they are of proper length. As the nail is clipped, the quick will withdraw. After this, keep an eye on their growth. Usually a monthly clipping will keep them short and smooth. Some dogs have clear toenails, so it is easy to see the quick. On dogs like Lucky, with black nails, I remove just past the "tapered" portion of the nail.

If the clippers are sharp, they leave the ends of the nail squared, with sharp edges. Dull clippers will splinter or crush the nail and can hurt the quick. These sharp edges must be removed. Special nail files are available, but require some patience on your part.

My vet showed me an excellent way to trim nails on my parrot. Dremel sells a battery powered tool, with a rotary sanding attachment. When charged, I can trim nails 6 or 8 times before recharging. After 2 years, I'm still on the same sanding wheel. When it begins to slow, I turn the unit on to completely drain the battery before charging. $40, Dremel Mini-Mite, with spare attachments.

With this tool, I don't have to clip as deeply into the nail, and can avoid the quick. If you should happen to sand into the quick, the heat cauterizes the wound. Nails can be quickly shortened and rounded, and my pets prefer shorter nail clipping sessions. I would suggest wearing a filter to avoid breathing the dust, and placing a light towel over your dog's face when doing the front nails. Flying dust is the main drawback to this type of clipping.

, , ,

English Cocker Spaniel Grooming Photo: Before and After

English Cocker Spaniel Grooming

English Cocker Spaniel Grooming Photo

Remember, one good thing about grooming your English Cocker is their hair grows pretty quickly - so anything you cut too short won't stay that way long!

Cocker Spaniel Groomig Grooming of Cocker Spaniel


, , ,

Grooming Tips For English Cocker Spaniels

The English Cocker Spaniel is an average shedder with aEnglish Cocker Spaniel Grooming Tips long coat. Regular and frequent grooming is essential to keeping the coat from matting or tangling.

Daily brushing is best, and this should include the hair on the feet. In addition, hair on the feet and around the pads can also be trimmed.

The ears need to be regularly cleaned of excessive wax, and baths or dry shampoos should be given only when needed.

, ,

Clippers.


When your pet looks and smells good, he receives more attention.
BTW, keeping your pet tangle free will cut your grooming costs. Average cost of grooming a Cocker is quoted at $30-60.
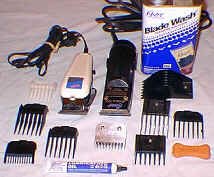
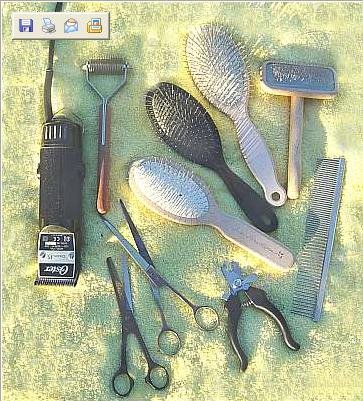
Hair clippers vary widely in cost and quality. The Wahl clippers (left) start under $20, while professional clippers, like the Oster (right), are priced at $100 and up. A wide variety of optional clipper heads are also available.
Wahl markets a number of different clipper packages. They all come with combs, which are attached to space the clipper head further out, allowing various lengths of clip. Some kits come with scissors, hair combs, and even a video on clipping your pet. For general clipping, I prefer the Wahl model MC and would recommend it for any beginner. Notice the lever on the side of the Wahl clippers (white). This slides the upper and lower blades forwards and backwards. When slid together, the clip is shorter for clipping around the eyes, when slid apart, the cut is slightly longer, for trimming the head and inside ear flaps. The longer clip helps avoid "stubble" which can cause your pet to scratch.
When buying your clippers, look around. 5 years ago, Wahl marketed their HomeCut model in one color for people, the same clipper in a different color for use on pets. Side by side at K-mart, the HomeCut was $10 cheaper, and it occasionally went on sale. In the pet stores the clippers were sometimes priced even higher. I picked up my first set for $18. With moderate to heavy use on two pets, these last about 2 years. Eventually they will begin to "growl" intermittently, which scares my dogs. I gave my first clippers away when they began showing signs of wear, and I've nearly worn out my second set.
I picked up the Oster model a couple years ago, because I do a lot of heavy clipping. I also picked up the optional "gap tooth" clipper head, about $35. In this head every other tooth is much longer. This allows a heavy coat to be sheared, while leaving enough length to avoid razor burn. The tips of the teeth are sharp very sharp, so some care must be taken when shaving around the neck "rolls". I find they do a quick, professional job. They are much heavier and the cord tends to twist the clippers in your hand. Their round shape and heaviness makes them more awkward than the Wahl.
Your clipper must be maintained properly. This includes keeping it oiled and cleaned. Allow the clipper heads to cool frequently. One mistake I made was to clip my dog's body, working down to more sensitive areas, like the feet and belly. By this time the clippers were quite warm and uncomfortable. The solution here is to split up your grooming session into several sessions, or to own more than one pair of clippers. Even though I own two sets, I like to split my sessions to avoid stressing my pets.
Between clipping pets, use a good head cleaner. This will clean out excessive buildups, and sterilize the clipper heads. Pour a little cleaner into a shallow dish and immerse the clipper heads into the cleaner, while they are running. When done, remove, clean, dry and oil your heads.
One additional item is needed to make a clipping complete, the requisite doggy bone. Most grooming shops give these out liberally, but I'm more stingy with treats. Give too many treats and they lose their special appeal. Each treat should be given with enthusiasm, so the dog knows they are something special, only given out because he was very good. Treats of cheese used to give out pills. Doggy bones are given for clippings and bathes. A vitamin or half a bone might be given out for sitting well while ear medicine is applied. Your pet will be as happy when receiving a small bone as when receiving the larger size, and he won't gain excessive weight.


, , ,

Scissors for grooming.


Scissors
Everyone who grooms their pets needs at least one pair of scissors. As a novice, I used whatever scissors were lying around the house. After all, scissors are scissors, right? After visiting a local dog show, I visited the vendor section outside... and was introduced to more types of scissors than I thought possible. These are available in an almost endless array of size, shape, and cost. Starting around $15 for a good pair, they range to over $100 and finishes range from stainless steel to brass to gold. A wide variety are available, especially from German manufacturers.

When looking for a good pair of scissors, find a pair that are comfortable and can be picked up with one hand. Blunt tips are always a good idea, especially for those used around the face and ears. You never know when your pet will turn.

For general clipping, I have a pair of inexpensive scissors (top). Their longer blades are good for trimming the feathers and skirts, where long strait cuts are needed. $8

Trimming the ear flaps called for a different set of scissors. Blunt tips are necessary in this area, and I opted for a set with a slight curve in the blade (center left). These also work well in trimming hair between toes and around toenails. $18, Millers Forge.

Trimming inside the ear canal required a smaller set of scissors. I chose a pair with enlarged blunt tips (center right) and found these also work especially well on foot pads. $20, Fromm Ice Stainless.

No set of scissors is complete without a set of thinning scissors (bottom). The larger blade has a number of teeth, each with a U shaped leading edge. On many dogs, the feathering is too heavy to lay properly. These blades are used to thin and taper the feathering so it lays more "naturally". I've seen it done in the grooming shops, but I have trouble with this grooming technique. When I'm finished, instead of a smooth transition, it looks more like it was trimmed with a weed whacker.


, , ,

Combs and brushes.


The first tool purchased by Cocker owners is a comb or brush.

The double ended comb (lower left) has wide teeth for thick coats, and fine teeth for the fine hair on ears. This comb, combined with a detangling rake, are all the basic tools needed for many pets. Various manufacturers, $5-8.
The detangling rake (right center) has a razor blade embedded in a protective covering. As it is pulled through matted fur, it cuts through the mats. I used a wet stone to sharpen the blade and reduce pulling of the fur. Some models have multiple blade, but I find they pull too hard and make grooming less comfortable. 4 Paws.
The card block (left top) has hundreds of spring wire teeth. After a thorough combing, the fur is blocked. This removes loose hair and gives the hair that silky, "poofy" look. Care should be used short hair to avoid scratching the skin underneath. Sergeants.
The grooming blade (top right) looks like a saw blade, leather handles. It can be used single handed, as shown, or unsprung to be held in both hands. The serrated edge is used down the dog's back, front to rear, to remove loose hair. Both dogs and cats seem to like their backs scratched with this blade, and you'll like it because there's that much less fur to fall off on the carpet. After a bath it's useful to "rake" excessive water from your pet's back. 4 Paws, $12.

Especially useful for grooming ears, varied-tooth comb can be held loosely in the hand, so it will "turn" rather than pull tangles. On a light combing, the widely spaced teeth "bite", with the other teeth coming into play as tangles are removed. I generally follow up with the double ended comb or with the card block. Wonder Fluff, $6.
, , , ,

Tool Box.


Tool box Cost under $5, Stack-on Tool Tote .

As odd as it may seem, tool box is probably the most important tool. I recommend you to have a pair of open totes, one for commonly used tools, another for the various items used less often.
I keep all the tools shown on this page, with the exception of the large clippers, which are kept in their carrying case.

Tools for Grooming.


Good table that will mount a 48 inch grooming arm and give access to all of the dog. The square arms are superior to the round ones
Oster home animal clipper from Care a lot. Any other clipper requires a #10 or 1.5mm or Medium blade designation.
Black and Decker Wizard with Ѕ inch sanding drums, 100 grit from Home Depot
I personally like 80 grit, particularly for larger nails.
Sheddr’ comb, large loop
4 inch slicker brush
Mars fine stripping comb
7-8 inch combo comb Fine/Medium
Ice on Ice conditioner.
30/inch thinning shears

Grooming of American Cocker Spaniel


Competition grooming is an art. Beauty salons for dogs are not in a position to groom for competition. There is virtually only the breeders or the professional handlers who know enough about it to give you satisfaction. If your breeder sold you a dog who will eventually be a show dog, it would be best that he is groomed by him since a show dog will not be groomed the same way a house pet.

The bath
The drying
The clipping

1. The bath
After cutting the claws, put your dog it the bathtub. With a showerphone, wet your pet's coat. Splash its coat with a good dog shampoo which has previously been diluted in about 10 times more water. Shampoo well without scrubbing too much not to mess up the coat. Repeat and rinse well. Mix the rinse solution : 1 part rinse for 20 part water and spread over the dog's coat, let it penetrate for a few minutes. Rinse abundantly. Wring out your friend with a couple of towels.

2. The drying
Make yourself comfortable to dry your dog because it is a very long procedure. Start by drying the inside of the ears and then the outside, by brushing the coat the wrong way (against the growth of the hair). The skin of the ear is very long to dry.It is important that the dog is dry before getting to the next step.

3. The clipping
You will need a clipper with a #10 blade to do the ears, the top of the nose, under the eyes and the throat. A #8½ or #7 blade for the back, the top of the head, the neck, the cheeks and the lips.Set the dog standing on the table. Grab an ear and clip it against the grain starting at the bottom of the fold and going up. Do the same on the inside of the pavillion. Neatly clear the orifice of the ear. Be careful not to cut the fine skin inside the ear. Repeat on the other side.

Using the same #10 blade, clip from the nose to the forehead, making a V shape in between both eyes. With the #8½ blade, going against the grain, clip the top of the skull. With a view top of the head, stop clipping at the imaginary line in between the ears. Always leave the front hair on the forehead: it will be trimmed whith thinning shears to give it a squareness look.
Set the dog in a standing position with its nose toward you. Bring the ears to the nose to clear the neck and use blade #8½ from the base of the ears to the shoulder clearing the front.

A suitable grooming will give your dog the desired appearance for its race. Your dog will also feel more comfortable and you will be happy to admire him.
Afterwards, start by clipping the back with thinning shears or with a stripper. The tail must be cleared underneath with the clipper and blade # 10. The rest of the back is trimmed with the thinning shears. Brush the coat while thinning until the desired appearance. This is a precision trim and you will acquire success with time and practice. Practice makes perfect!
Afterwards, using your clipper and blade # 8½, clip the base of the skull toward the back to the tail. Do the same for the whole back but when you get to the sides go down slowly without making any demarcations. To avoid this, lift your blade slowly when you go down the sides.The last step is to clip the paws, nice big rounded paws. Set the dog in a standing position. With straight shears, carefully clear the cushions under the paws.
Always brush the hair during the trimming to make sure you give it the desired fullness. It requires a lot of time and practice to achieve this. Since the coat grows very fast, you will have a lot of leisure time to practice.
One thing to remember: A fine grooming must have a natural look without any apparent strokes from the scissors